Tuesday, May 29, 2012

Total Color Tuesday (Launch post!)

As I've mentioned, I've been doing a lot of reading on design principles and the like. Lately, I've been reading Color Magic for Quilters by Ann Seely and Joyce Stewart. Now, there are a ton of books out there on color for quilters. I just happen to be using this one. I'll do a full review on an upcoming episode of my podcast. But for now, suffice it to say that the book spends a chapter on each color scheme of the color wheel and talks about applying it to quilts. And it goes far beyond the usual monochromatic, analagous, split-complementary and other schemes we're used to seeing in these kinds of books.

I thought I'd play with it, and suggest you play too. What I'm doing to do is go through the color schemes in the book, one per week (on Tuesdays), and see if I can pull fabrics from my stash that might fit that scheme. So each week, I'll imagine, "If I were to make a quilt entirely from my stash using this scheme, what might that look like?

And then I'll post a linky on that blog post for you to do the same--once you see the color scheme of the week, try it for yourself and link up to my blog with your attempts. If you have tiny stashes, go ahead and use EQ or something like that--but it is important to use actual fabric or fabric images. It's much harder that way than just putting some plain colors onto a computer monitor!

So, this week we're starting with one color. Color Magic refers to this as "single color harmony," and, of course, it's more widely known as monochromatic

Monochromatic use a single color--but you can use shades, tints, and tones within that color. You can also add neutral fabrics if you'd like--white, gray, black, for example, don't add actual (technical) color to a monochromatic scheme so they're legal, if you like to think in those terms. 

Contrast and scale are crucial here. If all of your fabrics are the same value and all the same scale of print, it'll most likely be a less exciting quilt than if you're able to have nice contrast, and a nice contrast of scale as well (large prints, small prints, "read-as-solids," etc.).

Play time.


BTW, I had to work very hard to find prints that had no other colors in them. That was probably the trickiest part. (A multi-colored print is no longer monochromatic, right? At least, if we're being legalistic about it, which for the purposes of this play time I chose to be.)

I started with greens. This one took me awhile to find a set I thought might actually work. My stash of greens didn't want to play nicely together for some reason.

I don't think there's quite enough variety of scale of print in this one. Not my favorite, but it could work.


The blues feel a little more successful because I have a wider variety of scale of print, and some of the blues are less muted than the greens were, so there is more variation of saturation (if that's the right term).

The blues were a little more social. It didn't take me as long to find a set that I could easily see being made into a quilt.
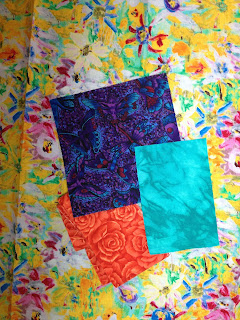
And here we have pinky-orange. Or orangey-pink. I have very few pinks in my stash and was surprised to find that several of them were actually this same type of pink--sort of salmon, or coral, or whatever you'd call it.

The fabric in the center is interesting--it looks purple when you put it next to some fabrics, pink when you put it next to others. That's probably one of the biggest things I've taken away from this exercise so far. As value is a relative thing, so can be color. What color seems to be dominant in a fabric can be just as relative as its value. Try to do this with taupes and see what I'm talking about! (Taupe is probably one of the most chameleon-like of the color families.)

So, play with your own stash. How would you make a monochromatic quilt with what you have? Link to the specific blog post, please! (If you've already made a monochromatic quilt, you can link back to that blog post as well.)

Monday, May 28, 2012

Slow Quilt Monday--The Crappy First Draft

I took a rather unintentional hiatus from my blog schedule of Slow Quilt Monday, Donation Quilt Wednesdays, and Food Fridays because I needed some time to regroup after getting back into my workaday schedule. However, that hiatus also gave me some time to ponder and process, so it turned out to be a good thing!

One of the things I worked on mentally while I was on sabbatical was, with credit to Anne Lamott for the wording, the concept of the "crappy first draft." (I apologize to any for whom that may be a distasteful word, but it's the best one to really describe the concept!) Lamott's book about writing, Bird by Bird, can apply to our entire creative lives, really. She talks about how our first responsibility is to get the story on the page, let the characters tell us who they want to be, and let the plot reveal itself to us--no matter how messy it is to start. That when we start worrying about who will want to read it, or whether it'll ever get published, we stymie ourselves and the creative spirit within us. First things first. Just write that crappy first draft, and worry about everything else later.

That really spoke to me.

I do have perfectionist tendencies but, then, I think most of us do. We don't like to start something unless we're pretty sure it'll turn out well in the end. When it comes to making quilts, we convince ourselves that fabric is too expensive to waste, so we shouldn't cut into it unless we know the color combination is just right, or the design will have exactly the impact we want, or whatever. And so, there are a lot of quilts in our heads that never come into being because we don't have enough faith in ourselves that they'll actually work.

I have since developed a remarkably devil-may-care attitude towards my fabric.

I have come to the following understandings of my quilting:
  • There are a lot of projects that will hit the trash can. I'm okay with that, because they will have been valuable learning tools. (General wisdom always says those projects should be saved into a book with copious notes about what worked and what didn't. But I have limited space, so probably not.)
  • There are a lot of projects I'll make that I'll really like but no one else will "get." I'm okay with that too. If I enjoy it, that's the main thing. As for everything else, see next items.
  • I'm not making projects to get applause at my guild's show n' tell. (Although I'll get that applause--they're very kind that way, fortunately. Everyone gets cheered on. Love my quilt peeps.)
  • I'm not making projects to put in a show. I might decide to do that later, but that's not why I set out to make them in the first place.
  • I'm not making projects to turn out a masterpiece. One might become that eventually. But I don't need that pressure in my head.
  • I'm making projects to have fun. I'm making projects to play with a new technique, color combination, design principle, or whatever. (Note the very intentional use of the word "play.")
  • I'm also a storyteller. I want my quilts, more than anything, to tell a story. Or convey a mood or a concept.
  • And, yes, my quilts will be made slowly.
Awhile back, there was some conversation that floated around between a few of our quilty podcasts (mine and others) about the difference between product and process in the quilting world, and whether or not you're a product or process quilter. I'm definitely in the process camp now.

Slow quilting doesn't necessarily mean you can't get a project done because you're really busy--although if that's the case with you, cut yourself some slack. Who's got a timer on you, anyway? We create within ourselves a sense of obligation because we think people expect things of us (that perhaps they're not really expecting), or we can't say no. That's a topic for another blog.

Slow quilting, rather, means allowing a quilt time to breathe, time to reveal itself to you.

It means making thirty-five sketches of something before one jumps out at you and you get that little tingle down the back of your neck: "Me! I'm the one you need to make! Make me me me me!"

It means having fabrics laying on your cutting table or design wall for several days in a row as you audition one to another, collecting, editing, collecting again, until a particular combination reveals itself as the one.

It means buying a lot of fabric. You need a lot of options for all that, don't you?

I've been working on a project for the last five months. I started out one night just cutting shapes out of fabric and laying them down to see what they'd turn into. It has become a quilt that tells a story. It does have several problems with it. Awhile back, I'd have set it aside--or thrown it aside in frustration--because it wasn't "good enough." Now, rather than seeing it as the enemy, I'm looking at it as a friend who is encouraging me to move forward, to experiment, to have faith in myself. I'm still working away at it, looking at it as a chance to continue learning, to continue trying new things, to continue to experiment with techniques or methods to see how they turn out. The end result may still end up hitting the trash can, but it may not. It might work itself out. In either case, it's a slow process but an extremely valuable one. That quilt has told me, every step of the way, what I needed to do next. I still don't entirely know what the end product will look like. And that's the fun of it.

Would it help you in your quiltmaking if you could accept the concept of "the crappy first draft?" Can you be okay with something that doesn't turn out perfectly but helped you learn along the way? Is there a project in your head that you've been afraid to start because, frankly, you're afraid you'll screw it up? Could you use a little slow quilting in your life?

Thursday, May 24, 2012

Episode 92 In Which We Talk Scraps with Charlotte

Charlotte's Quilts (Episode 92)Bags of scraps donated to Charlotte's scrap-quilting causeCharlotte's scraps waiting to be cutCharlotte's organizational systemCharlotte's bags of UFOs and WIPsCharlotte's Quilts (Episode 92)
Charlotte's Quilts (Episode 92)Charlotte's Quilts (Episode 92)Charlotte's Quilts (Episode 92)Charlotte's Quilts (Episode 92)Charlotte's Quilts (Episode 92)Charlotte's Quilts (Episode 92)
Episode 92 In Which We Talk Scraps with Charlotte, a set on Flickr.

Here is the photo gallery that accompanies Episode 92 In Which We Talk Scraps with Charlotte.

It starts with pictures of her organizational system. You'll see her bulletin board with ziploc baggies organized by size, and her white board where she keeps charts, and her project bags where she keeps detailed notes about where she is with each project.

Then you'll be treated to the eye-candy of her quilts--beautiful! Hopefully you'll get some good ideas for using up your own scraps!

Wednesday, May 23, 2012

So Stinkin' Cute


Receiving blanket #2
Originally uploaded by sandyquiltz
I finished the second receiving blanket tonight. I was taking my time, listening to an episode of Crafty Garden Mom podcast, which seemed very appropriate since she's got a couple of little bitties in her house. I was just puttering along in no rush, so it was sort of a very zen process.

These are just about the cutest darn receiving blankets I ever did see. If you need a baby gift, I strongly recommend you check it out!

My Guild Retreat pics

If you're interested in seeing pictures of what happened at my guild retreat last weekend, you may want to check out our Canal Country Quilters blog. My quilty peep Lori and I administrate it, although she does the lion's share of the work. (Thanks, Lori!) She's working on getting the pictures from the weekend posted--she's gotten the first day, including our paintstik class, done so far. She's hoping to have the rest up this week.

You can find it at http://canalcq.wordpress.com/.

Consider subscribing! We always post pictures of our show n' tell there now, plus periodically other helpful information. I'll have a post about paintstiks going up in a couple of days that give a lot of information about how to use them (more than I've posted here, I believe).

As you know, I love love love my guild. We have a blast. So, you're welcome to have fun with us vicariously! (And if you live in the area, consider coming for a visit. There's an "about" page that lists our meeting times and locations.)

Monday, May 21, 2012

Another finish and some homework


 I finished the first of two receiving blankets tonight. These are going to be for a friend of mine who is expecting her first baby, a little girl, this July. I'm also going to be making her a quilt but just couldn't resist making a couple of these really cute receiving blankets using the same Missouri Star Quilt Company technique I used for all the donation quilts I helped new sewers make back in March.

I'll finish the second one tomorrow or Wednesday--it's all cut and ready to go.

Tomorrow night is our quilt design study group. Since we had to shuffle our schedule around a bit in April to accommodate travel schedules, we ended up with a six-week stretch between meetings. I suggested we do homework, which is supposed to be a regular part of our experience but we've been skipping a lot. (We do a lot more in-session, however, so it's sort of a toss-up.) I figured with six weeks, it wouldn't be a problem. Of course, I left it to tonight to do. Yes, I can spell procrastination.

We had just done a segment on color and Vicki, who led the session, had prepped all the materials for us to each make our own fabric color wheel and it contains little spinny cards to put in the center with a variety of color schemes on them. Our homework was supposed to be to choose a color scheme we wouldn't normally use and do something with it.

So, tonight, I pulled out the color wheel and threw all the little center spinny cards face down on my table and shuffled them up. Drawing one at random, I then put it in the center of the color wheel and, eyes closed, spun it around a few times then landed it somewhere. Opening my eyes, this is what I found:
(The writing says, "4 points on a square.")

Yep, that's definitely a color scheme I wouldn't normally use. Yellow, blue-green, purple, red-orange. My first thought was, "ick."

I burrowed through my scraps for awhile, still thinking at that point that I might just do a little fused something-or-other, so I didn't want to commit whole pieces of fabric. I found the blue-green and purple pretty easily--those are colors I do drift towards on occasion. Red-orange was a little trickier mostly because it's hard to find something truly red-orange and not red or orange. I finally landed on one. But yellow? Wow. That was a toughy. I've discovered I don't actually have a lot of yellow in my stash. I had a few random yellow scraps but they were all a lot more shaded (and I use that word in its official artistic sense) than I wanted to go with the other colors. Finally, I dug into my fat quarters and there it was. The perfect yellow. 

And, in fact, a lovely combination altogether. Bright, admittedly, but just imagine it with a some white thrown in there to calm it down. I'm picturing festive appliqued flowers on a white background with the yellow as a border. Or cute little mini-stars pieced into that yellow as a background in a mini-quilt.
But, to be honest, that's an image that will never get made into reality. I've got too many other more pushy designs in my head demanding my attention. It was a fun project, though, finding those colors. And now I do have some new color combination possibilities in my head. Try it yourself sometime!

Sunday, May 20, 2012

Retreat Report

...And a good time was had by all.

Actually, a fabulous time was had by all! Have I mentioned before how much I enjoy my guild peeps? And there's a handful of women who aren't members of our guild but are linked through friends and such, so they come to our retreats on a pretty regular basis as well. Might I say, they fit right in. Very, very entertaining women.

I didn't bring the kitchen sink.

However, after a few years of going on retreat, the furniture I pack seems to grow each time. I just get a lot more done if I have a decent set-up. My Sew-Ezi table (somewhere under the bins on the left, there) is a godsend. Love that thing. I also have a lightweight, foldable craft table that's only an inch or so shorter than the Sew-Ezi. I brought that this time and mostly used it as a small pressing station with my travel iron, but sometimes moved it over to sit next to the Sew-Ezi to hold the extra bulk of larger projects while I worked. Also extremely useful, so that's now made it to my list of "always pack" items.


This time I'd also volunteered to bring my ironing board and iron as one of our four communal pressing stations, so that added just a bit to the stacks. Everything else pictured here are projects. My clothes? Last packed, least planned, lightest weight.

Sadly, the one project I really wanted to work on--a baby quilt for a friend--I stymied myself by packing all the fabric but forgetting to print off my EQ7 design and cutting instructions. Dang. Couldn't touch it. But I got a lot else done!

First, the setting...

A nice Methodist church camp/conference center on Silver Lake in Western New York. It was about 85 degrees most of the weekend. Gorgeous!


(Forgot to take a picture before I left so this one was shot out my car window as I was driving away--sorry about the rotten composition.)

This was the building we pretty much lived in for the weekend, although our bedrooms were in another building. The lower floor was our sewing room, the upper floor the dining room. There were a couple of other groups there that weekend but we only saw them briefly during meals. It's a nice space, although we can't plug too many irons in at once or we blow a fuse. Hence the communal pressing stations. However, we've also got fewer women going these days than a few years ago so we've been able to loosen up the restrictions on small travel irons. The conference center cook, Becky, is excellent. I probably gained five pounds.

Ah, but on to the quilting! What did I get done?


I got the binding put together and sewed onto the front of Fortune. All I have to do now is the hand-sewing on the back, a good TV project. (Planning on doing that tonight after I get this blog posted.)

And yes, our tradition is to tape our finishes to the wall as we go. Wall space gets slim by the end of the weekend!

(That's my little craft table with my pressing station on the left, btw, if you're curious. And our retreat schedule taped above it so I could keep track of when we were going to have our ice cream social so I didn't disappear at the wrong time. Priorities.)


I also finally found fabric (more about shopping trips below) for the third border on my medallion challenge quilt and was able to get that done. The colors are a complete departure from what I'd initially imagined, but the store didn't have what I'd thought I'd wanted and at this point, frankly, I was tired of trying to figure this out. So with guild-mate Florence consulting, I decided to go with this set of a light gray-with-blue/green speckles background, and a green and blue deconstructed star. The blue fabric is the same as the lighter blue fabric in the center block, so that was a happy find. Now I just have to do the last border, which will be that same black/gray as the other narrower border--if I still have enough! (I designed the border as paper pieced blocks in EQ7.)

...and I put borders on Paintstik Peacock. I'd made borders with blue/green/turquoise fat quarters using the stack n' slash method. I wasn't sure I wanted those borders all the way around because I was afraid they'd overwhelm the peacock. I had it all laid out on one of our communal cutting tables and a few folks walked over to see what I was doing and offer their two cents--as we quilters like to do. It was Vicki that hit on exactly the right idea--offset the borders. Only use the blue on two sides. Finish the third border with black, and leave the top alone.


Absolutely perfect.


Peacock has now been renamed Vicki's Peacock, although I told her that didn't imply she was going to get him!


I also started some receiving blankets but didn't get far on them, so more on that later.

Onto the shopping! Of course, any good quilter's gathering always includes some visits to local shops. A few of us went to Mt. Pleasant Quilt Company on Friday, and a couple of us went to Material Rewards on Saturday. Both great shops!


Got some fat quarters, just 'cause.


Some end-of-bolt stash fabric--pretty decently discounted so, why not?


Now, for just a minute, feast your eyes on this one. Mmmm.


A white batik.


Does anyone else love some fabrics so much you just want to ingest them?


Mmmmm.


So I had to find something to go with it.


Found these to start. Very pretty.


But it needed something.


Decided it needed more contrast. So I found the dark teal (bottom of picture) to add to the stack.


Still not quite enough.


There it is. Purple.


Mmmm.......


So that's my retreat report. Guild-mate Lori will be posting pics of everyone's projects on our guild blog, so as soon as that's up, I'll post a link. There was a lot of eye-candy going on!

Friday, May 18, 2012

Finally--A Finish!

This wallhanging has been almost a year in the making--and it was supposed to be a fast, simple project. I wanted something for my dining room wall that would say "summer!" and would rotate with the flag wallhanging I have that goes up Memorial Day and Fourth of July, but that I didn't necessarily want hanging up the entire summer. So I thought, "I know! Primary colors! Pinwheels!"

The basic pinwheel part was done pretty quickly. Then I pondered borders. "I know! I'll use the Double Diamond Ruler by Kim Templin!" (See episode 41 for my interview with Kim.) I thought it would look like a cute garden fence around my pinwheels, thereby turning the pinwheels into flowers. My summer wallhanging was beginning to take on a theme.

Unfortunately, I didn't have quite enough of the fabrics I needed to use for the double diamonds to do a full border of them, so I did half borders and framed the center with them. I actually like the way that looks better, anyway.

And, of course, I couldn't leave it at that. With the more complex border, the pinwheels now looked just a little bit plain. And they had morphed into flowers--so how could I make them more flower-esque? "I know!" I thought, yet again. "I'll do yo-yos!" This required finding fabric in my stash that coordinated but didn't stick out like a sore thumb...which was a task unto itself. But I persevered...and I think I only ended up having to buy the yellow because that's not something that typically exists in my stash much.

Yo-yos made (using the Clover yo-yo tool, which makes it very easy), I realized I'd need something in the center. Wait for it.... "I know!" I decided to use buttons. The first buttons I bought were white, because I thought I'd like the clean, fresh look of white buttons unifying the different colors of the pinwheels and yo-yos. The only buttons I could find at Joanns with 16 that matched were on the small side, but I thought I could make it work.

I sat down one night and started sewing those dang yo-yos and buttons onto the pinwheels by hand. It took me almost half an hour to get one done--it ended up all cock-eyed and didn't have the clean affect I wanted, plus I had 16 of those stinking things in total to finish. At a half hour a pop I wasn't sure it was worth it. I threw it to the side in frustration.

You guessed it. By now I was sorry I'd ever started the stupid project.

"I know!".... and I pulled out my sewing machine manual to check a niggling memory I had that I could sew buttons on by machine. Sure 'nuff, there it was. I sat back down with my wallhanging and little white buttons and started on the first one, high hopes and dreams of having it done by the end of the afternoon.

Urgh. And more urgh. The buttons were too small for me to really easily hold them in place while I was sewing, and they were just high enough that my presser foot couldn't quite mash them down far enough for the needle to do its work. I finally got one sewn on, but when I pulled it out and looked it...all cock-eyed and nasty again. Threw is to the side in frustration again.

A couple of weeks later, I decided to go to Joanns and see if I could find bigger buttons. Standing in front of the collection of white buttons, I kept counting and recounting different designs in mounting frustration again--there weren't 16 of any one design. And none of them were interesting enough to warrant getting different designs.

I was just about to bag the whole yo-yo button thing as I turned to walk away when my eyes lighted on a set of buttons that were very different than anything I'd pictured in my head. Interesting. The more I thought about it, the more it tickled me. Suddenly I went from "simple, fresh summer wallhanging" to "funky hippy fun wallhanging."

The new buttons worked swimmingly. I wasn't able to get the four different designs I wanted so I held up for a bit while I tried to order one of the designs online--and ended up losing money when the secure site I'd purchased from suddenly disappeared with no trace and...no buttons. But it was only $11 so I'm not sweating it. Just yet another delay in getting this supposedly simple project done. I ended up back at Joanns buying the other set of four buttons that I hadn't liked as well the first time but can live with, because done is better than perfect.

So, all that being said, introducing "Sandy's Hippy Peace Garden."