If only that were a word, "ephemerality." It would be a good one.
I subscribe to "The Best of YouTube" and while mostly it's just a cheap pleasure, sometimes videos really make you stop and think. While I was watching this one, I couldn't help but wonder, "Would I feel more free in my quilting if I knew it would only be there for three hours? Would that liberate me?"
I wonder how much I get bunched up just because I'm thinking, "Others will be seeing this for years to come," or the perennial, "Will I be able to live with that?"
This artist creates art that will only last a matter of hours--and he takes such joy in that. He's so energized by the time frame and by the fact that it'll be wiped clear and he has a clean slate again.
I wonder...
What do you think?
(It's almost 10 minutes long--but worth the time.)

Sandy's blog on quilting, life, and sundry.
Sunday, June 27, 2010
Monday, June 21, 2010
"Use It or Lose It" Challenge update
Because I inherited so many specialty rulers and other gizmos from my Mom when she passed away, I proposed a new challenge to my guild-that-is-not-a-guild at the beginning of this year and because others were feeling a similar pinch, they hopped on board. So this year is the inaugural year of the "Use It or Lose It" challenge! Basically, anyone who is playing along listed 3 quilty items (in our case, rulers, tools, or books were all considered fair game) that had been on their shelves for at least one year and had never been used. In other words, this is our challenge to use those items that sounded just so nifty cool at the time and we just had to have them, but they have never been broken out of their packages and sit forlorn, collecting dust.
We have until October to use the items on our list--whatever we haven't used by then we "lose" to a silent auction during a guild meeting in November. Or, if we use an item and decide it's just not all that and a bag of chips, we can chose to gift it to that same silent auction.
My three items were a Fons and Porter binding ruler-tool thingie (I'd bought that myself some time ago), a set of Marilyn Doheny circle wedge rulers I'd inherited from Mom, and the Marti Michell Log Cabin rulers and book, also inherited. Here's the thing--forasmuch as all these rulers seemed like good things to keep from my Mom's studio, if I didn't have some external pressure they'd never get used and they'd still be in my drawer 10 years from now, untouched.
We have a few different benchmarks along the way of this challenge--every couple of months, anyone who has a "finish" gets their name put in a drawing and the winner gets a half yard of fabric from the kitty. (The registration fee for the challenge was a half yard of fabric.) I haven't won yet, and to tell the truth, I'm trying to use up fabric, not win more. So the drawing isn't a big motivator for me. But having those benchmarks is an excellent reminder to keep myself moving on the challenge.
 I knocked off the binding ruler quite quickly--I've been doing a lot of bindings lately with finishing all of Mom's UFOs and some of my own. Now I'm working on the circle wedge rulers to see if I can use them before the next benchmark, which is next month's meeting. We don't actually have to finish whatever project we use the items in--and, in fact, can use the item in any other project as well. The only real rule is that you have to use the item for the purpose for which it was originally intended. You'd be amazed at how creative a quilter can be at trying to find the loopholes!
I've been brewing an idea for using the circle wedge rulers for awhile, and tonight started pulling out fabrics to see what I could put together. Think ancient Egyptian art. And that's all I'm gonna say for now. Of course, I could just slap some fabric down, slice into it, and sew it back together and call it a day. For the purpose of the challenge, that would get me through. But I can't quite make things that easy on myself. Instead I'm getting all fancy with it. Hopefully I'm not just creating myself a UFO that will end up on my UFO challenge list 5 years from now!
If I get anything real accomplished this week, I'll post pics. But to be honest, I'm trying to stay off the computer as much as possible this week so I can get some sewing done. At the moment, I'm just waiting for my iron to heat up so I can get down to work!
Wednesday, June 16, 2010
Summer Creativity Challenge Posted
Head on over to the podcast show blog and check out the summer creativity challenge. Hope you'll join the fun!
http://quilter.podbean.com/creativity-challenge/
(Or, if you're on the home page of the quilter.podbean.com site, just click on the "Creativity Challenge" tab. It'll stay there all summer for you to ponder!)
http://quilter.podbean.com/creativity-challenge/
(Or, if you're on the home page of the quilter.podbean.com site, just click on the "Creativity Challenge" tab. It'll stay there all summer for you to ponder!)
Sunday, June 13, 2010
Quilt Shop Hop--Day 3
Day 3 and done. Phew. I'm exhausted. Somewhere around store 5 or 6 yesterday I commented to one of my cohorts, "I think I'm starting to suffer from overstim."
But I had a fant-ab-ulous time. (Or would that be "fabric-ulous time"?)
Last shop, and then my little personal debriefing:
 Last, but certainly not least, was Ivy Thimble (Victor).
Why didn't we make it here on Saturday? Because it's nowhere near any of the other shops on the list for this particular shop hop. But that doesn't stop the Intrepid and Determined Quilter.
This was my first ever visit here because it's a bit of a haul for me. I really do like this shop--I'll definitely be making more of an effort to get back there again. Since this was my last shop I only bought one charm pack (future freebie giveaway!). But I scoped out possible future purchases. You know, once I have money again. Like in 2013.
This is a fairly sizeable shop for our area--lots of bolts of fabric. Great batiks section, great flannels section, great blenders section. Great everything section.
So--here's what I learned that I'd like to pass along to you, for the next time you're wanting to go on a shop hop.
1.) There are a ton of great quilt shops in Western NY. C'mon over, y'all, ya hear? (There are several area quilt shops that weren't participating in this particular "official" shop hop--so there's a whole bunch more really nice ones than I've blogged about here!)
2.) Work on a cash-only basis. (Sigh.)
3.) Get yourself a Sonja. Without her maps and pre-planning, we'd never have been as efficient as we were. And we never felt rushed! It was a nice trip. Thanks, Sonja.
4.) Use electronics for good. One time, I should've done a quick online check of pricing before purchasing. That was the only downside to the whole trip. But overall, I could've kept much better track of what I was seeing in each shop that might have come in handy later. Now I'm going to sit tonight and program some of this stuff into my phone for future reference, but it would've been a lot easier to be doing it while I was standing right in the store. (For those of you with Droids--that "Footprints" app is a great way to track all the fun shops you're visiting. Much easier to do it at the moment you're standing in front of the store than trying to input everything later.)
OK--that's it. Now I have to start figuring out what I'm doing with my new fabric friends. And playing with my new Janome feet. There's no stopping me now.
But I had a fant-ab-ulous time. (Or would that be "fabric-ulous time"?)
Last shop, and then my little personal debriefing:

Why didn't we make it here on Saturday? Because it's nowhere near any of the other shops on the list for this particular shop hop. But that doesn't stop the Intrepid and Determined Quilter.
This was my first ever visit here because it's a bit of a haul for me. I really do like this shop--I'll definitely be making more of an effort to get back there again. Since this was my last shop I only bought one charm pack (future freebie giveaway!). But I scoped out possible future purchases. You know, once I have money again. Like in 2013.
This is a fairly sizeable shop for our area--lots of bolts of fabric. Great batiks section, great flannels section, great blenders section. Great everything section.
So--here's what I learned that I'd like to pass along to you, for the next time you're wanting to go on a shop hop.
1.) There are a ton of great quilt shops in Western NY. C'mon over, y'all, ya hear? (There are several area quilt shops that weren't participating in this particular "official" shop hop--so there's a whole bunch more really nice ones than I've blogged about here!)
2.) Work on a cash-only basis. (Sigh.)
3.) Get yourself a Sonja. Without her maps and pre-planning, we'd never have been as efficient as we were. And we never felt rushed! It was a nice trip. Thanks, Sonja.
4.) Use electronics for good. One time, I should've done a quick online check of pricing before purchasing. That was the only downside to the whole trip. But overall, I could've kept much better track of what I was seeing in each shop that might have come in handy later. Now I'm going to sit tonight and program some of this stuff into my phone for future reference, but it would've been a lot easier to be doing it while I was standing right in the store. (For those of you with Droids--that "Footprints" app is a great way to track all the fun shops you're visiting. Much easier to do it at the moment you're standing in front of the store than trying to input everything later.)
OK--that's it. Now I have to start figuring out what I'm doing with my new fabric friends. And playing with my new Janome feet. There's no stopping me now.
Quilt Shop Hop--Day 2 Cont'd
And now we'll get through the rest of day 2. Hold onto your hats!
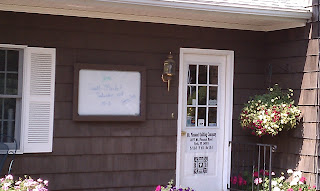
 OK, so when I stopped in the last blog, I believe we were still hanging out in Sew What? Quilt Shop. A bit further away was Marie's Sewing Center (Lockport). It looks very unprepossessing from the outside, but you can't judge a book by its cover. This little door and little sign did not herald adequately the wealth that was within.
 Particularly for this Janome girl.
I've been using Mom's Janome 6600 for a year now, and had no idea that there were other types of acu-feed feet I could get. Plus, I'd heard a podcaster (Huge apologies--it was awhile back and now I don't recall which of you was talking about this) raving about the new Janome free-motion quilting foot and special free-motion bobbin case. So I checked them out. I now own the quilting foot and have the bobbin case on order, as they were out.
I also picked up a special binding foot to see if that works any better for me on putting binding on completely by machine. Haven't had good luck with that before. Maybe this will be the ticket.
I almost bought an acu-feed stitch-in-the-ditch foot until I recalled that there was some sort of foot, still unopened in its package, sitting in my sewing cabinet at home that I'd inherited from Mom with the machine. I'd never paid attention to what it was. Too much other stuff I'd been sorting through at the time. So--fortunately, as it turns out--I waited to buy any other specialized feet until I could see what it was. The end of that story? When I got home and checked--yep, it's the stitch-in-the-ditch foot that I'd been seriously considering at the store. Phew. Thanks, Mom
OK--back to the hop.
 What felt like "a fur piece" away, although still within the same township going by the address, was Heartland Quilt Shop (Lockport). I mean, this really felt like it was out there. But a very nice shop. Seemed to have a very committed clientele of regulars--a few were there while we were. They were clearly fans. I could see why.
Heartland seemed to specialize in Moda (yay!) and country-style fabrics, although they had some Amy Butler and I believe I recall seeing some Kaffe Fasset as well. If I lived closer, I could imagine myself being quite happy with this as my home base shop. It probably had been a real-live house at one point so it's sort of a warren of rooms, each with a special focus. Neat to poke around in.
 Next up--and another bit of a drive away...The Whole Nine Yards (Medina). I heart this shop.
It has a similar feel to Country Treasures (see Quilt Shop Hop--Day 1). It's a mix of country/primitives and fabric, although The Whole Nine Yards is larger so their fabric selection is more extensive than Country Treasures. I'd guess that the gifts/primitives is about the same between the two because Country Treasures uses their space really, really well.
 In any case, at this stage of the shop hop I was trying to seriously cut back on my expenditures so I didn't buy much fabric here but I easily could've. Mostly, it was a joy to just look around. Very nicely done.
(This picture so doesn't do it justice. Check out their website for better interior shots. No website shopping, unfortunately, but if you plan to be in the hinterlands of Western NY, this is a place you definitely need to add to your itinerary.)

Besides--how can you resist a comfy kitty sunning herself in the window display?
And then we drove. And drove. And drove some more. A little under an hour later, we made it to the next stop on our shop hop...

Chestnut Bay Quilting. (Caledonia).
I actually discovered this shop several months ago. I was really glad I'd found it. Chestnut Bay has a very nice collection of wool for wool felt projects, a great selection of batiks, and a whole room full of Civil War repro and that style of fabrics. Plus other fabrics, of course. Again, not a huge shop, but she makes great use of her space. Plus the store owner is very friendly and I've enjoyed every stop I've made there.
By the way, if you go to Chestnut Bay, plan to have lunch or dinner right across the street at the Caledonia Village Inn. Great, great food and atmosphere.
 Finally, our last stop of the day--Mt. Pleasant Quilting Company (York). I've been here whole bunches. This was one of my Mom's fave shops, so I used to pick her up and we'd make a day of it.
Not only does Mt. Pleasant have a great selection of fabrics--plus one of the nicest flannels sections I've seen--they have excellent and affordable long arm services. I have had several quilts done here and have never been disappointed. Plus, dropping off or picking up is a good excuse for me to check out the new fabric. I don't get here too often because it's a drive and I have several shops much closer to me that I enjoy visiting. But I will say, it's worth the trip.
By then we were exhausted and the stores were near closing for the day, so we headed home. A couple of us agreed to meet this afternoon for the last shop we had to complete to have our names entered in the drawing for all the prizes, so in keeping with my roughly-chronological posting system, that will be the next blog entry!


I've been using Mom's Janome 6600 for a year now, and had no idea that there were other types of acu-feed feet I could get. Plus, I'd heard a podcaster (Huge apologies--it was awhile back and now I don't recall which of you was talking about this) raving about the new Janome free-motion quilting foot and special free-motion bobbin case. So I checked them out. I now own the quilting foot and have the bobbin case on order, as they were out.
I also picked up a special binding foot to see if that works any better for me on putting binding on completely by machine. Haven't had good luck with that before. Maybe this will be the ticket.
I almost bought an acu-feed stitch-in-the-ditch foot until I recalled that there was some sort of foot, still unopened in its package, sitting in my sewing cabinet at home that I'd inherited from Mom with the machine. I'd never paid attention to what it was. Too much other stuff I'd been sorting through at the time. So--fortunately, as it turns out--I waited to buy any other specialized feet until I could see what it was. The end of that story? When I got home and checked--yep, it's the stitch-in-the-ditch foot that I'd been seriously considering at the store. Phew. Thanks, Mom
OK--back to the hop.

Heartland seemed to specialize in Moda (yay!) and country-style fabrics, although they had some Amy Butler and I believe I recall seeing some Kaffe Fasset as well. If I lived closer, I could imagine myself being quite happy with this as my home base shop. It probably had been a real-live house at one point so it's sort of a warren of rooms, each with a special focus. Neat to poke around in.

It has a similar feel to Country Treasures (see Quilt Shop Hop--Day 1). It's a mix of country/primitives and fabric, although The Whole Nine Yards is larger so their fabric selection is more extensive than Country Treasures. I'd guess that the gifts/primitives is about the same between the two because Country Treasures uses their space really, really well.

(This picture so doesn't do it justice. Check out their website for better interior shots. No website shopping, unfortunately, but if you plan to be in the hinterlands of Western NY, this is a place you definitely need to add to your itinerary.)

Besides--how can you resist a comfy kitty sunning herself in the window display?
And then we drove. And drove. And drove some more. A little under an hour later, we made it to the next stop on our shop hop...

Chestnut Bay Quilting. (Caledonia).
I actually discovered this shop several months ago. I was really glad I'd found it. Chestnut Bay has a very nice collection of wool for wool felt projects, a great selection of batiks, and a whole room full of Civil War repro and that style of fabrics. Plus other fabrics, of course. Again, not a huge shop, but she makes great use of her space. Plus the store owner is very friendly and I've enjoyed every stop I've made there.
By the way, if you go to Chestnut Bay, plan to have lunch or dinner right across the street at the Caledonia Village Inn. Great, great food and atmosphere.

Not only does Mt. Pleasant have a great selection of fabrics--plus one of the nicest flannels sections I've seen--they have excellent and affordable long arm services. I have had several quilts done here and have never been disappointed. Plus, dropping off or picking up is a good excuse for me to check out the new fabric. I don't get here too often because it's a drive and I have several shops much closer to me that I enjoy visiting. But I will say, it's worth the trip.
By then we were exhausted and the stores were near closing for the day, so we headed home. A couple of us agreed to meet this afternoon for the last shop we had to complete to have our names entered in the drawing for all the prizes, so in keeping with my roughly-chronological posting system, that will be the next blog entry!
Quilt Shop Hop--Day 2
I'm going to divide Saturday in half because we visited a ton of shops. We managed to make really good time. None of us thought we'd actually be able to get through all the shops we got through, but we did. And even stopped for lunch. And never felt rushed in any of the stores. There were five us in our group--me, Kate, Lois, Kathy, and Sonja--and we had a great time!
I spent way too much. But that's another post for another time.
12 shops in the shop hop. I did 2 shops on my own. That left 10. One of which is nowhere near any of the others. Sonja did a fantastic job mapping everything out and figuring out the best route to take--so we met early early in a nearby parking lot, everyone climbed in my car, and we made the longest stretch of drive first. About an hour and 15 minutes to the first shop. Timed it perfectly. Got there two minutes before the shop was supposed to open for the day, but they already had their doors unlocked and ready to go! We'd decided ahead of time that when we got to shop number 7 on our list, we'd assess where we were time- and energy-wise. We got to 7, had plenty of time, and just enough energy, that we were able to hit shops 8 and 9 as well. Some of us are completing the shop hop by visiting 10 today (the one nowhere near anywhere else)--Kathy and I are carpooling. Everyone else is on their own. But more about that later.
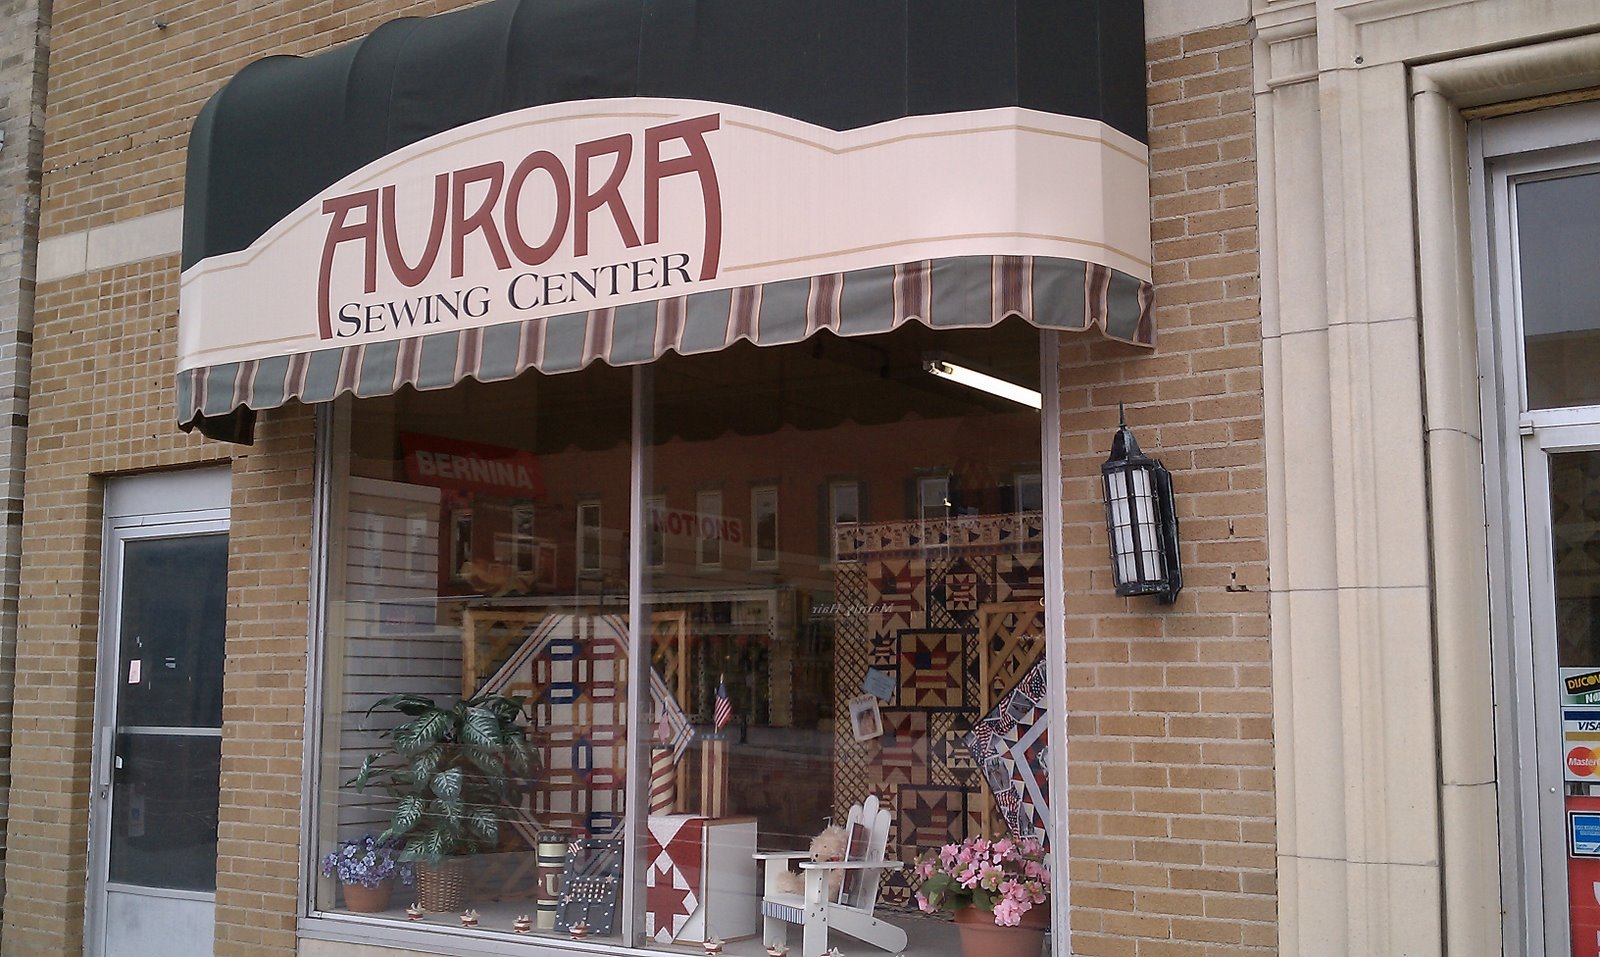
 So--first shop: Aurora Sewing Center in East Aurora.
First time I'd ever been there. Actually, first time I'd ever visited most of these shops, which is why I did the shop hop. I realized later I should've taken notes about what each shop seemed to specialize in, etc., but didn't. Dang.
Loved this place. I got a quick demonstration on a Baby-Loc serger I'd been considering. A little pricey for the moment, I think, so I'm trying to decide if I want to go with a lesser machine I can afford now and eventually go up, or if I want to hold out a few more years to get one I really want. Hmmm. Anyway, this is definitely a place I'd go back to. And East Aurora is a pretty village center.

Next, Carriage Quilt Shoppe, just up the road from the last shop. Literally. We could've walked from one to the other but didn't realize that until we'd already taken the car.
Nope--never been there either. If I go back to visit one, I'd be definitely visiting both!

Carriage Quilt Shoppe was a very little shop--not a lot of elbow room--but gorgeous displays and lots of great inspiration. Very nicely done! I dropped a disproportionate amount of money here for the size of the shop. Their offerings were apparently right in my wheelhouse.
Cool moment note: the designer of a couple of the patterns I'd decided to buy worked in the shop. Always kind of neat to meet the person behind the product. Martha Eddy of Eddy and Eddy Designs: Check it out.
 A little bit of a further drive (but still not bad--maybe 15 minutes? Don't recall now); and we're at the second of the Aurora Sewing Center locations (Williamsville, same website).
Another very nice shop. Both Aurora Sewing Centers had nice big classroom space. This one seemed a little smaller than the other to me, but still nice fabrics and other sundry. Both locations have lots of sewing machines for demonstration and for sale--Baby-Loc and Bernina.
 Once again, just up the road from the last shop (couldn't walk from one to the other this time, mostly because they're on really busy streets, but only about a 3 or 4 minute drive), was Sew What? Quilt Shop (Williamsville). This shop had a ton of kid's panels and specialty fabrics. They also seemed to have a goodly collection of landscape-type fabrics, and a nice section of batiks. The classroom space seemed a bit smaller but still comfortable, and I particularly enjoyed checking out the sample quilts on the classroom walls. Very nice stuff.
I'm trying to remember--I think that might have been the shop where I saw a whole shelf of very pretty pre-quilted fabric; you know, the kind that makes it really easy to make totebags. I wish I'd written down which shop I was in when I saw that. Wherever it was, there were several very pretty options.
OK--ran out of time for blogging this morning. More later!

I spent way too much. But that's another post for another time.
12 shops in the shop hop. I did 2 shops on my own. That left 10. One of which is nowhere near any of the others. Sonja did a fantastic job mapping everything out and figuring out the best route to take--so we met early early in a nearby parking lot, everyone climbed in my car, and we made the longest stretch of drive first. About an hour and 15 minutes to the first shop. Timed it perfectly. Got there two minutes before the shop was supposed to open for the day, but they already had their doors unlocked and ready to go! We'd decided ahead of time that when we got to shop number 7 on our list, we'd assess where we were time- and energy-wise. We got to 7, had plenty of time, and just enough energy, that we were able to hit shops 8 and 9 as well. Some of us are completing the shop hop by visiting 10 today (the one nowhere near anywhere else)--Kathy and I are carpooling. Everyone else is on their own. But more about that later.
 So--first shop: Aurora Sewing Center in East Aurora.
First time I'd ever been there. Actually, first time I'd ever visited most of these shops, which is why I did the shop hop. I realized later I should've taken notes about what each shop seemed to specialize in, etc., but didn't. Dang.
Loved this place. I got a quick demonstration on a Baby-Loc serger I'd been considering. A little pricey for the moment, I think, so I'm trying to decide if I want to go with a lesser machine I can afford now and eventually go up, or if I want to hold out a few more years to get one I really want. Hmmm. Anyway, this is definitely a place I'd go back to. And East Aurora is a pretty village center.

Next, Carriage Quilt Shoppe, just up the road from the last shop. Literally. We could've walked from one to the other but didn't realize that until we'd already taken the car.
Nope--never been there either. If I go back to visit one, I'd be definitely visiting both!

Carriage Quilt Shoppe was a very little shop--not a lot of elbow room--but gorgeous displays and lots of great inspiration. Very nicely done! I dropped a disproportionate amount of money here for the size of the shop. Their offerings were apparently right in my wheelhouse.
Cool moment note: the designer of a couple of the patterns I'd decided to buy worked in the shop. Always kind of neat to meet the person behind the product. Martha Eddy of Eddy and Eddy Designs: Check it out.

Another very nice shop. Both Aurora Sewing Centers had nice big classroom space. This one seemed a little smaller than the other to me, but still nice fabrics and other sundry. Both locations have lots of sewing machines for demonstration and for sale--Baby-Loc and Bernina.

I'm trying to remember--I think that might have been the shop where I saw a whole shelf of very pretty pre-quilted fabric; you know, the kind that makes it really easy to make totebags. I wish I'd written down which shop I was in when I saw that. Wherever it was, there were several very pretty options.
OK--ran out of time for blogging this morning. More later!
Saturday, June 12, 2010
Quilt Shop Hop--Day 1
It was the weekend of the Western NY Quilt Shop Hop! This is the first time I've done an "official" shop hop--not just hopping in a car with my Mom or a friend and hitting a few shops we wanted to visit. This one was organized by the shops themselves. We have a little "passport" that gets stamped at every store and at each shop we get a gift of four 2 1/2" strips. When we complete visiting all the shops in the time allotted, our names gets put in for a drawing for several prizes and we get the pattern that we can make with all the strips. Some shops also gave away other little gifts (tootsie rolls, granola bars--you know, things to keep you going). Several of my guild-that-is-not-a-guild peeps decided we'd make a road trip on Saturday, but we knew we wouldn't get to all of the shops on the list in one day. So we decided we'd visit some of the more local-to-us shops on our own before Saturday.
 So, for me, Day 1 of the Shop Hop was a solo flight on Thursday evening when I hit two shops nearby while my daughter was at her lessons. I started at my "home base" shop--Betty's Quilting, Etc. (Spencerport). Love my shop!
 And I discovered that Betty's now carries a wide variety of my new love, "Stonehenge." Ahem. Let's just say I stocked up. Here's my stack to be cut on the cutting table. (I don't claim the blue in the far right corner, although I was admiring it!)
OK--probably not smart to do at the first stop on a shop hop that includes about a dozen stores. But if I'm going to throw my committed support behind a shop, Betty's is the one I've got the most vested interest in keeping open!
I left Betty's and headed a bit down the road to Country Treasures (Brockport).
 Country Treasures, as you can tell by the window dressings, isn't just a fabric/quilt shop, but also a really wonderful gift shop. But also a wonderful fabric shop. But also a wonderful gift shop. But...
Well, you get the picture. I love this store. She doesn't carry a ton of fabric but enough. Lots of Moda. Mmmm. I restrained myself, however, and just picked up a little bit of (Moda) wool for felted wool projects. Pretty pretty colors.

 So here's just a couple of glimpses of what Day 1 added to my stash.
Stonehenge! Love it love it love it. Can't wait to use it.
In addition to the Stonehenge, Betty's had this great ombre (gradated) fabric. I bought three colorways--this is a black to very very light gray. Can't wait to play with it. The other two colorways I purchased were both neutrals. My daughter has now asked me to go back and buy this in blue. How can I deny my daughter? (But she'll have to wait. I need to build up the quilting budget again.)
Quilt Shop Hop Day 2 will be posted tomorrow. After 10 hours of driving and shopping, I need to put my feet up and regroup!
 So, for me, Day 1 of the Shop Hop was a solo flight on Thursday evening when I hit two shops nearby while my daughter was at her lessons. I started at my "home base" shop--Betty's Quilting, Etc. (Spencerport). Love my shop!
 And I discovered that Betty's now carries a wide variety of my new love, "Stonehenge." Ahem. Let's just say I stocked up. Here's my stack to be cut on the cutting table. (I don't claim the blue in the far right corner, although I was admiring it!)
OK--probably not smart to do at the first stop on a shop hop that includes about a dozen stores. But if I'm going to throw my committed support behind a shop, Betty's is the one I've got the most vested interest in keeping open!
I left Betty's and headed a bit down the road to Country Treasures (Brockport).

Well, you get the picture. I love this store. She doesn't carry a ton of fabric but enough. Lots of Moda. Mmmm. I restrained myself, however, and just picked up a little bit of (Moda) wool for felted wool projects. Pretty pretty colors.

 So here's just a couple of glimpses of what Day 1 added to my stash.
Stonehenge! Love it love it love it. Can't wait to use it.
In addition to the Stonehenge, Betty's had this great ombre (gradated) fabric. I bought three colorways--this is a black to very very light gray. Can't wait to play with it. The other two colorways I purchased were both neutrals. My daughter has now asked me to go back and buy this in blue. How can I deny my daughter? (But she'll have to wait. I need to build up the quilting budget again.)
Quilt Shop Hop Day 2 will be posted tomorrow. After 10 hours of driving and shopping, I need to put my feet up and regroup!
Thursday, June 10, 2010
Creativity Challenge Completed! (Episode 14 "In Which We Were Creative")
What a hoot this was! I loved getting the responses to the creativity challenge I issued. Thanks so much to Lynn, Frances, and Virginia for playing!
Here's the original photo again, just to jog your memories:


I really like the way Lynn used her quilting to represent the water marks on the side of the barge, and the emphasis on the shadow as a vertical line amidst all the horizontal/diagonal going on. The saturated colors really bring almost a mysterious mood to the piece for me as well--reminiscent of the mysteriousness of the man's shadow on the side of the barge. Love it!
And here's the response from Frances:
 I like the gravel background!
But seriously, I love how Frances interpreted the colors of the piece into fabric, and the "wateriness" of the shadow itself, being interrupted by other fabric. She also played with contrast of value in hers by using a pretty wide range of fabrics. Really cool stuff.
And now for something completely different. Virginia's inspiration from the photo played out in a traditional pieced block and I love it.
 Virginia played off the yellow/orange in the photo and used that to pull coordinating colors from her stash. Many of the fabrics are batiks, which also are a bit reminiscent of the watery feel to me as well, plus the borders relate for me to the steel/metal of the barge in the original photo. I also like that Virginia was able to pull out the diagonals from the original photo into a block that's diagonal.
Really, really cool stuff. Love all of them! It's just so much fun to see how different people get inspiration from the same photo.
Now, here's mine (also very different). I continued my experiments with Lutradur and photo printing on fabric in this piece. I won't say much more about it--to hear about my process and why I did what I did, listen to the episode!

(By the way, the bottom border looks like it's pulling up but it's not. I had to fold it to get it in my totebag to take to my guild meeting this week for show n' tell. Lesson learned. Lutradur and canvas don't fold. They bend. There's now seemingly a permanent crease in there!)
I'll post again later today or tomorrow with the responses to the "debriefing" questions that I sent to the three responders. I asked them about their process and so forth. I've also got a new creativity challenge I'm issuing--stay posted!
Here's the original photo again, just to jog your memories:

Here is the response I was sent by Lynn. For more information about her entry (and just to read some fun blogging!) check out Lynn's blog.

I really like the way Lynn used her quilting to represent the water marks on the side of the barge, and the emphasis on the shadow as a vertical line amidst all the horizontal/diagonal going on. The saturated colors really bring almost a mysterious mood to the piece for me as well--reminiscent of the mysteriousness of the man's shadow on the side of the barge. Love it!
And here's the response from Frances:

But seriously, I love how Frances interpreted the colors of the piece into fabric, and the "wateriness" of the shadow itself, being interrupted by other fabric. She also played with contrast of value in hers by using a pretty wide range of fabrics. Really cool stuff.
And now for something completely different. Virginia's inspiration from the photo played out in a traditional pieced block and I love it.

Really, really cool stuff. Love all of them! It's just so much fun to see how different people get inspiration from the same photo.
Now, here's mine (also very different). I continued my experiments with Lutradur and photo printing on fabric in this piece. I won't say much more about it--to hear about my process and why I did what I did, listen to the episode!

(By the way, the bottom border looks like it's pulling up but it's not. I had to fold it to get it in my totebag to take to my guild meeting this week for show n' tell. Lesson learned. Lutradur and canvas don't fold. They bend. There's now seemingly a permanent crease in there!)
I'll post again later today or tomorrow with the responses to the "debriefing" questions that I sent to the three responders. I asked them about their process and so forth. I've also got a new creativity challenge I'm issuing--stay posted!
Monday, June 7, 2010
It sounds like a horror movie but...

Gotta love anything named "creeping." But it should be pretty. Not that mine looks like this yet. Rather, I now have five little tiny patches of green bitty leaves interspersed along a boulder wall in my front yard. I had to leave the plant markers in so my husband wouldn't accidentally yank them as weeds. I doubt they'll even look like this by the end of the summer, but at least they should look like something by then.
We've been in this house for 4 years now and I've yet to find anything that will actually grow over the top of that wall and flow attractively down the front of it like I've dreamed. It gets a kazillion degrees out there and is subject to pretty high winds, so we can only plant the most hardy of stuff. Daylillies--check. Ornamental grasses--check. Sedum--check. A few other wildflower-esque things that now I can't remember what they're named--check. But pretty flowy things? Not yet. The alyssum lasted all of about 5 minutes, the creeping sedum is growing about a quarter inch a year, and I've had a few tragic ends to other hopeful plants. I think I'm starting to hear them scream when I come towards their little table in the garden shop.
So, since I've had a lot of luck with herbs over the years and it's amazingly hard to kill them (they are, after all, edible weeds), I decided to give the creeping thyme a shot. I'll just try not to have nightmares of it eventually "creeping" it's way into my bedroom in the dead of night and wrapping itself around my neck.
It feels good to have finally gotten my hands in some dirt this weekend. I got my tomatoes planted, as well as some mint, basil, and rosemary to supplement the other herbs that did come back from last year (anyone need oregano, sage, or tarragon? Bumper crop already). I'm a little late--usually Memorial Day weekend is the big planting season around here. Any earlier, and they freeze their little roots off. Later and you can't get the produce off before it freezes at the other end. I think we'll be good. Round about mid-August I should start being able to make pasta sauce almost completely from my garden. I still have a few other random empty spots I need to find something to plant in but hopefully by the end of next weekend I'll be done and we can just wait and see what survives our strange little mini-ecosystem.
OK, so this isn't a quilty blog entry. Sorry. I have been sewing but I'm finishing up the creativity challenge project so I can't really say much about it nor can I post pictures yet. Later this week--promise! I can't wait to post pictures of other folks' responses to the creativity challenge that I've been sent--this is so freaking cool! I love seeing how different people interpret the photo. Nifty keen.
Saturday, June 5, 2010
O Tomato

O tomato, you do make me smile.
Every now and then you have to buy something just because it's entertaining. But in this case, this truly bizarre looking example of tomatohood is inspiring me in my attempts to be healthier. Although I like fruits and vegetables, I don't tend to naturally eat the suggested 5-7 a day. I have to be very intentional about it. So at the grocery store this morning I got a lot of my usual produce and then wanted to get something just a little different to try.
OK, so it's still a tomato. But at least it's a funny looking tomato. That's different. And it's an heirloom variety, which I've never tried. So that's different. So it counts.
Who knows--maybe it'll be my next creativity challenge photo to throw at you all!
Friday, June 4, 2010
Episode 13 In Which We Get Classy--Some More Info
I posted episode 13, "In Which We Get Classy," last night, and I give some tips for making your class time more enjoyable and effective. I wanted to give a little more information here that may be useful as well.
Just as a point of interest, I saw a blog entry today that gives a little of the other side of the story--issues teachers face when planning classes/workshops: http://elizabethbarton.blogspot.com/2010/06/off-to-teach-workshop.html.
Also, here's the start of a list of basic supplies you probably ought to have in your "go-bag" for classes or retreats. As I suggested in the episode, either have a separate bag permanently packed with duplicate supplies, or post a packing check list on your bulletin board for fast reference. Here's my usual list.
Standard Supplies for Classes/Retreats
- Pins (your favorite variety and/or specialized pins for planned projects, such as applique or basting)
- Pin cushion
- Thread snips
- Seam ripper
- Rotary cutter
- Extra cutter blade/s
- Disposal case for used blades
- Cutting mat of appropriate size
- Pressing mat of appropriate size
- Travel iron or Clover mini iron (more so for retreats than classes--although check retreat rules since plugging in too many irons blows fuses...ask me how I know...)
- Rulers (6x24", 6x12" or similar, 6" square or similar, and 1x6", get me through most situations)
- Sewing machine needles
- Disposal case for used needles
- Fabric scissors
- Bag for scraps/threads
- Sewing machine, foot pedal, and power cord
- Sewing machine manual
- Acrylic extension table (such as this--if you don't have one, strongly consider it!)
- Sewing machine feet (1/4", standard, and walking foot get me through most situations)
- Extension cord and power strip (less so for classes, definitely good to have on retreats)
- Thread in neutral colors (or colors needed for projects)
- Bobbins with threads in neutral colors (or colors needed for projects)
- Pencil/Pen and scratch pad
- Calculator or Fabri-Calc (my fave electronic device!)
- Marking tools
- Hand sewing needle (even if you're not planning to do any hand sewing. Trust me. Been there done that.)
- Thimble
- Needle threader
- Portable light (more so for retreats than classes--lighting often stinks)
- Pillow to sit on, and/or back rest, or bring your own sewing chair (I haul mine to retreats!)
I'm probably forgetting something. What else?
Also--to tote supplies back and forth, here are some ideas:
- You can get any number of quilter's supply totes which are wonderful. I used to have two. My dogs threw up on them. Now I have zero.
- I'm using a fishing tackle box now (easier to clean off dog messes). It's a new one, of course--no fish guts here. Not sure if it's identical to the one in the link but sure looks like it. I can fit a ton of notions, cutters, scissors, etc., in there. Basically, everything but the big stuff. I still miss my supply bags but I like the fact that the tackle box doesn't collapse on the floor and create a black hole you have to dig through. It's really easy to find everything and it stays compact under my available space in classes or retreats.
- Someone in one of my classes had a great stackable drawer system originally intended for nuts and bolts and such that she'd bought at a big box hardware store. She had all her thread, basic notions, needles, etc., in there and it looked really useful. I couldn't find a picture of it online--sorry. But a lot of times you'll find stuff in the hardware section that's perfect and a lot cheaper than buying something from a specialty craft store.
Let us know what your favorite bag or carrying system is!
Wednesday, June 2, 2010
Playing with Lutradur, Part 3 (Yay! Pictures!)

First, in the midst of all the stashbusting I've been doing, let me start out with show n' tell of some new fabrics that have mysteriously made their way onto my shelves. I had nothing to do with it, I swear. First, the absolutely wonderful Alexander Henry Halloween line that I think is named "The Ghastlies." The main focus print I ordered is on backorder. I should have it in a few weeks. I'm not a huge fan of Halloween fabrics but I love this line!

Next, the beautiful "Big Poppy" set of coordinates from Michael Miller. I've got another one of this set coming--also on backorder. Boy, Hancocks of Paducah--you've got to order it the second you get the catalogue or they're out. BTW, those poppies live up to their name. They're huge!
OK, on to the Lutradur.... As I'd mentioned, my sister Dianne came up for the weekend over Memorial Day and we just had a great time messing around. Dianne's spent a lifetime playing with various art mediums, I'm a little more new to town. So her presence helped me cut loose and just have fun, and not worry about the results. After all, Lutradur is cheaper than fabric. So what if I end up tossing something that didn't work?


Dianne had photoedited this using a scan of fabric to create the frame.

We also played with a variety of paints. Here are some scraps I'd trimmed off other Lutradur pieces. We didn't coat them with anything--just painted.

The front is a nice blend of the two. I don't think she used much water on this--I think it's mostly paint. We were using sponge brushes, by the way. I remember she seemed to be doing more "pouncing" than brushing on this one.

Could do some fun things with that.


(Oops, I think I rotated the photo wrong. Tip your head to the right and look at it sideways to see the birch trees.)


Both of our hands were covered with a variety of what were originally pretty colors, but when all mixed together into a fingerprint didn't make an attractive presentation.
Dianne did another couple of prints but for some reason, I didn't take pictures of them. I think when she was working on those, I was going hot and heavy on my creativity challenge project.

Tuesday, June 1, 2010
A New Toy!
I had lunch on Friday with the group I refer to as "Mom's Quilty Friends." This is her gang of peeps that she hung with for decades (not that any of them are old, mind you!). They've graciously "adopted" me after Mom's passing and I periodically get together with them and we play show n' tell.
One of Mom's friends showed us a project she'd made using a product I'd never heard of before, and I seriously need to get my hands on some of this stuff to play! I've already dumped it in my shopping cart on a website. It'll get purchased the next time I place an order.
It's called "Texture Magic" by Superior Threads. In a nutshell: You sew it to your fabric, hit it with a steam iron, and it gets all wonderfully wrinkly. Great dimensional stuff going on! Mom's friend had used it in a Christmas quilt on the ornaments--it was great.
Here's the first of three YouTube videos from Superior Threads that show you how it's used.
Subscribe to:
Posts (Atom)